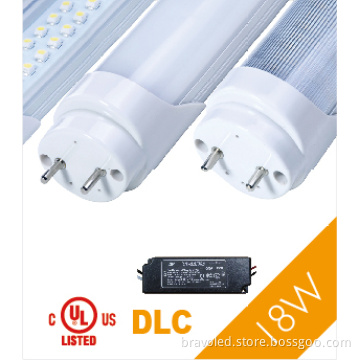
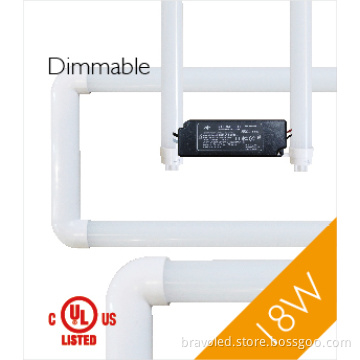
External Driver 2ft U-Bent LED Tube Light with UL/cUL Dlc Listed
- Payment Type:
- T/T
Quantity:
Your message must be between 20 to 2000 characters
Contact NowBasic Info
Basic Info
| Place of Origin: | China Mainland |
|---|---|
| Payment Type: | T/T |
Product Description
Product Description
DLC UL/cUL listed 18W - 2ft U-bent tube light Internal Driver
Specifications
1) Operate Voltage: 18W 100~277V AC, 50/60Hz
2) LED Type: SMD2835
3) Lumens of signal tube: WW 1,800lm/ CW 2,000lm 90lm/W
4) Lumens of 2lamps for 2x2 troffer: 36 W WW2,800lm; NW:2900lm;CW:3000lm, 85lm/W
5) End Cap Option: plastic, aluminum
6) Lense Option: Frosted, Clear, Striped
7) Color Temperature: warm white: 3,000K~3,200K
natural white: 4,000K~4,300K
cool white: 5,000K~5,200K
8) CRI: Ra>80%
9) Beam Angle: 150°
10) Net Weight: 0.70kgs/pc
11) Input Current: 0.3A
PF>0.95 THD>18%
Model NO:BL-T8-18W600-U WINS -32F
LED type: SMD 2835
Shape: U-shaped
Input Voltage: 100~277Vac
Certificates /Reports: UL, DLC, LM79, LM80, ISTMT, Lighting facts
Installation
Steps 1: Turn off the power at the source first
Steps 2: Untwist the conventional fluorescent lamp and then remove.
Steps 3: Cut the AC Positive Line and AC Neutral Line.
3.1 Bracket with inductive ballast
Open the diffuser of the bracket(if any). Removing the starter and ballast by cutting the wires according to picture A. And Remove the
ballast and starter from lamp Fixture.
3.2 Bracket with electronic ballast Open the diffuser of the bracket(if any). Removing the electronic ballast by cutting the wires according
to picture A. And Remove the electronic ballast from lamp fixture
Steps 4: Connect the AC Postive Line and AC neutral Line to the input side of the external driver.
4.1 Connect the AC Neutral Positive Line direct to the white wire(ACN) from the driver by using connection caps provided. Then connect
the AC Positive Line to the black wire(ACL) coming from the same driver by using connection caps provided.
Steps 5: Connect LED fluorescent lamp to external driver according to picture A.
![External Driver 2ft U-Bent LED Tube Light with UL/cUL Dlc Listed]()
Steps 6: Install the LED lamp to the retrofitted luminaries, close the diffuser.
Steps 7: Mount the clip to the fixture. Drill three holes(3 mm diameter) to secured the clips by srcew and nut on the lamp fixture.
![External Driver 2ft U-Bent LED Tube Light with UL/cUL Dlc Listed]()
![External Driver 2ft U-Bent LED Tube Light with UL/cUL Dlc Listed]()
Steps 8: install the metal case for power supply protection
8.1 Put the power supply into the metal box and then fixed to the lamp box with screws near lamp.
8.2 Open two little holes (the diameter about 4 mm) near the lamp for fixing the protection box. The protection box should be made
of steel with minimum 0.51mm thick to fully enclose the LED Driver and should not have any open holes.
8.3 After modification completes, then affix the Lamping Replacement Marking label and cautionary label to painted surface and bare
aluminum , located this where visible during re-lamping on the retrofitted luminaire.
Specifications
1) Operate Voltage: 18W 100~277V AC, 50/60Hz
2) LED Type: SMD2835
3) Lumens of signal tube: WW 1,800lm/ CW 2,000lm 90lm/W
4) Lumens of 2lamps for 2x2 troffer: 36 W WW2,800lm; NW:2900lm;CW:3000lm, 85lm/W
5) End Cap Option: plastic, aluminum
6) Lense Option: Frosted, Clear, Striped
7) Color Temperature: warm white: 3,000K~3,200K
natural white: 4,000K~4,300K
cool white: 5,000K~5,200K
8) CRI: Ra>80%
9) Beam Angle: 150°
10) Net Weight: 0.70kgs/pc
11) Input Current: 0.3A
PF>0.95 THD>18%
Model NO:BL-T8-18W600-U WINS -32F
LED type: SMD 2835
Shape: U-shaped
Input Voltage: 100~277Vac
Certificates /Reports: UL, DLC, LM79, LM80, ISTMT, Lighting facts
Installation
Steps 1: Turn off the power at the source first
Steps 2: Untwist the conventional fluorescent lamp and then remove.
Steps 3: Cut the AC Positive Line and AC Neutral Line.
3.1 Bracket with inductive ballast
Open the diffuser of the bracket(if any). Removing the starter and ballast by cutting the wires according to picture A. And Remove the
ballast and starter from lamp Fixture.
3.2 Bracket with electronic ballast Open the diffuser of the bracket(if any). Removing the electronic ballast by cutting the wires according
to picture A. And Remove the electronic ballast from lamp fixture
Steps 4: Connect the AC Postive Line and AC neutral Line to the input side of the external driver.
4.1 Connect the AC Neutral Positive Line direct to the white wire(ACN) from the driver by using connection caps provided. Then connect
the AC Positive Line to the black wire(ACL) coming from the same driver by using connection caps provided.
Steps 5: Connect LED fluorescent lamp to external driver according to picture A.

Steps 6: Install the LED lamp to the retrofitted luminaries, close the diffuser.
Steps 7: Mount the clip to the fixture. Drill three holes(3 mm diameter) to secured the clips by srcew and nut on the lamp fixture.


Steps 8: install the metal case for power supply protection
8.1 Put the power supply into the metal box and then fixed to the lamp box with screws near lamp.
8.2 Open two little holes (the diameter about 4 mm) near the lamp for fixing the protection box. The protection box should be made
of steel with minimum 0.51mm thick to fully enclose the LED Driver and should not have any open holes.
8.3 After modification completes, then affix the Lamping Replacement Marking label and cautionary label to painted surface and bare
aluminum , located this where visible during re-lamping on the retrofitted luminaire.
Related Keywords
Related Keywords
You May Also Like
You May Also Like
-

2700lm LED Shop Light (BL-SP230-30W)

LED Spotlight PAR38 with Energy Star UL cUL
UL 150W LED Floodlight (BL-FL-150W-347-XX)
Related ProductsProduct Categories-
LED Street Light(1)
-
LED High Mast Light(1)
-
LED Floodlight(18)
-
Wall Washer Light(1)
-
Professional Lighting(1)
-
Spotlight(32)
-
Other Outdoor Lighting(13)
-
Floodlight(32)
-
LED Wall Light(5)
-
LED Panel Light(32)
-
LED Ceiling Light(1)
-
LED High Bay Light(32)
-
LED Tube(32)
-
LED Cup(1)
-
Candle Light(1)
-
Dimmable Bulb(19)
-
LED Spotlight(4)
-
LED Bulb Light(8)
-
Wall Light(1)
-
Down Light(18)
-
Ceiling Light(2)